Tutorial 9:
Creating a temperature controller supervisor for your temperature regulator

Our temperature regulator can now act as a servant, let’s build a supervisor to control it.

We will build this:

The diagram below shows what you will build. The red dots show the steps.

Step 1:
Create a temperature controller component with log and view

1. Create a new type that you inherit from PD 7664 process component.

2. Rename to "XX temperature controller simple".

3. Add a servant proxy for our component "XX temperature regulator notification".

4. Create two registers "Control setpoint" and "Temperature log" of quantity absolute temperature

5. Enable logging for the registers.

6. Set default value for setpoint to 25 degrees Celcius.

7. Set the range of both registers.

If you don’t know how to do it, refer to tutorial 1 step 2 (create local variables) and 4 (create registers) and tutorial 3 (adding data logging).

8. You should not be able to change the temperature log. So you need to remove set access rights for "Temperature log".


9. Override calculate actual and write temperature into the temperature register and write the setpoint to the servant.

This is what your code should look like:

10. Create a view for the component based on PD_11813 Comp view

11. Add views for your two registers and the name of the component.

12. Adjust the view region so it fits the content.

Your view should look like this:

SEE HOW IT WORKS

Step 2: Create the main assembly with a view

1. Create an assembly.

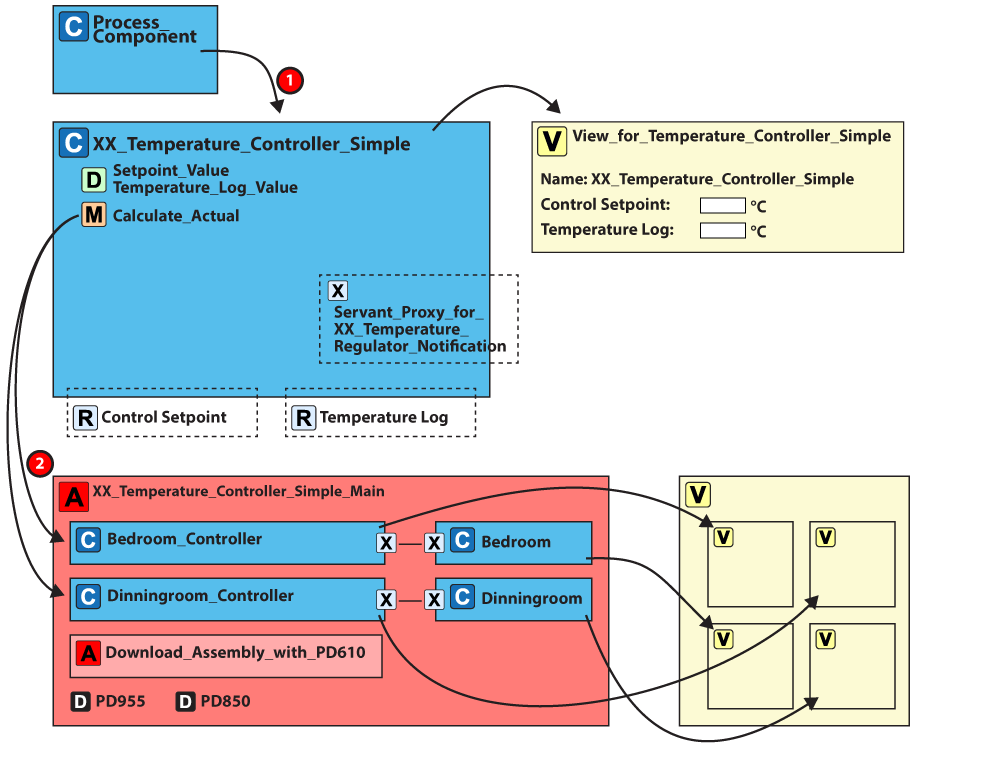
2. Rename to "XX temperature controller simple_main".

3. Add two instances of "XX temperature controller simple".

4. Rename one to "Bedroom controller" and one to "Diningroom controller".

5. Add two instances of "XX temperature regulator notification assembly".

6. Rename one to "Bedroom" and one to "Dining room".

7. Connect the supervisors and servants.

8. Add one instance of: "Download assembly for tutorial" (which include a PD955 COPP PC for download and a PD610). Furthermore please ad a PD850 and "COPP PC with display".

9. Connect the nets and locate your components in the PD850.

10. Create a view for your main assembly with a controls section for the temperature controllers and a regulator section for the temperature regulators. You can reuse any of the views you already made. Refer to tutorial 4 if you are unsure how to do it. 

Your view should look like this:

SEE HOW IT WORKS

Step 3: Create, build, and run the project

1. Create a project and rename to "XX temperature controller simple project".

2. Add your main assembly "XX temperature controller simple main". 

3. Add your view from step 2 as the guest view on the COPP PC with display.

4. Find the "Project Downloader device" in the "download" assembly and set it as the downloader. 

5.Type in serial numbers for the devices.

6. Reuse the testbed as-is. 

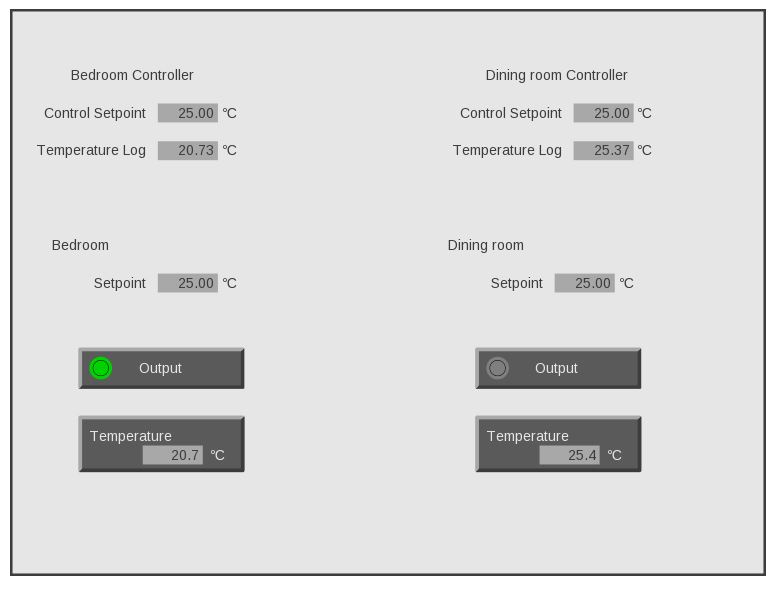
7. Set the control setpoint to various values, notice how it gets sent to the servant. Likewise, observe how the actual temperature gets sent from the servant to the supervisor

SEE HOW IT WORKS

Now let us move to the next tutorial where, you will learn how to use
state machines to control your system.