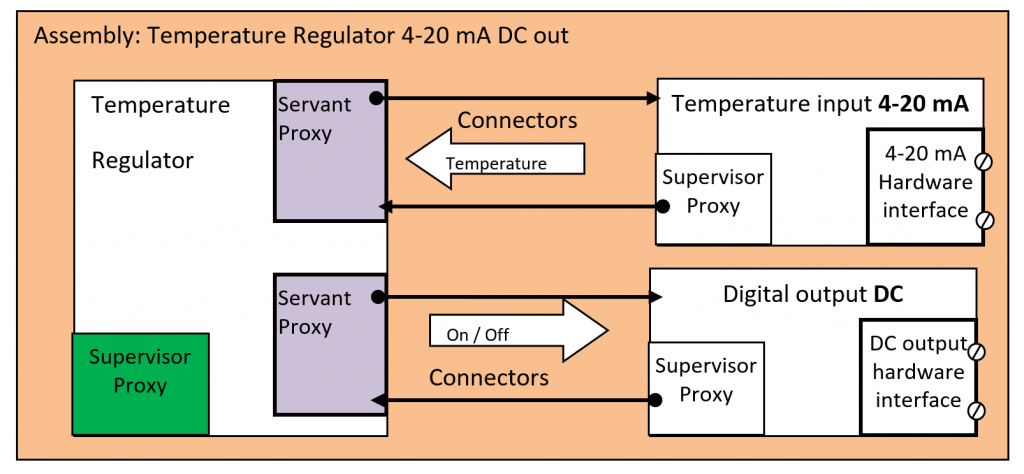
TUTORIAL 8: EXPOSING YOUR TEMPERATURE REGULATOR AS SERVANT FOR OTHER SUPERVISORS
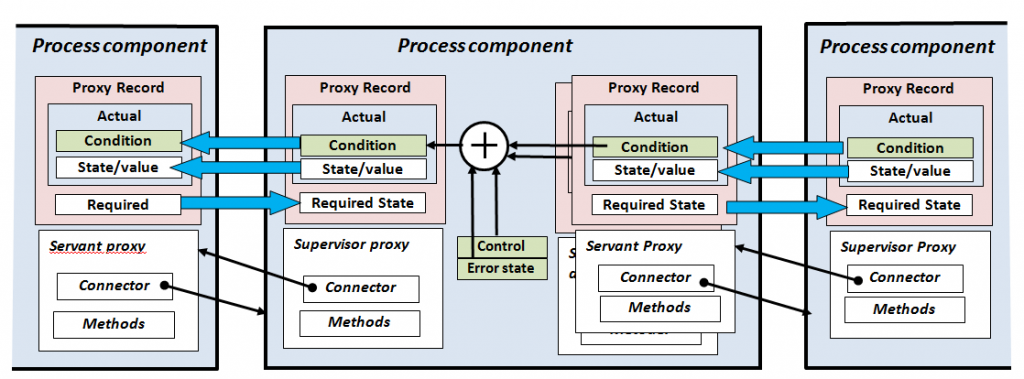
Now let’s come back to the idea of the notification model. We want to change our regulator so other supervisors can use it. But while it is still a supervisor to its own servants.
Note that the control mode and error state of the servants ripples up to the supervisor.
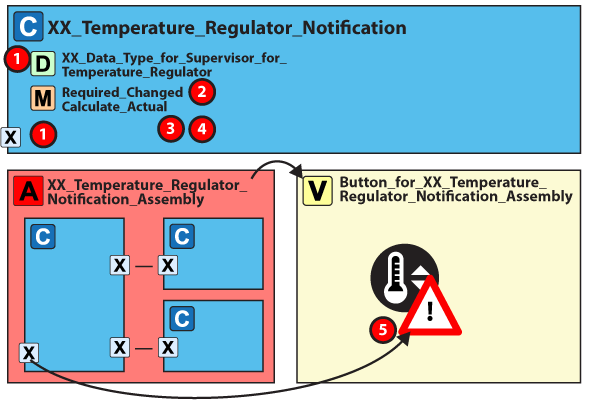
We will build this:
The diagram below shows what you will build. The red dots show the steps.
While your component has a built-in supervisor (the green box on the drawing below), you need to make an interface to it, so the component will display the functionality you have designed to its supervisor.
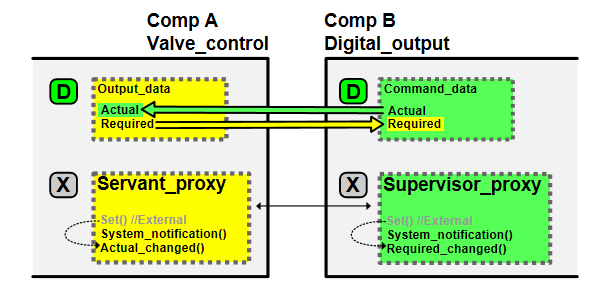
You create this interface via a proxy record.
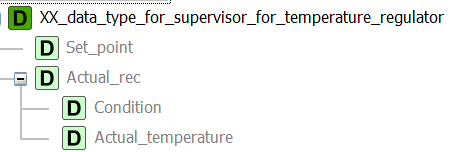
Required and Actual must be in the proxy record.
You can rename the record elements but document such changes, so other people can use your component.
You should define Actual as a record and its first element must be of data type PD_7883 – Condition def. This is used to transmit the condition of the component.
Actual can include a component state or component value for example.
You can fit the data type of Required and the extra fields in Actual to the project.
Needs
We will now change our temperature regulator so that it gets a setpoint from the supervisor. I.e. "Required" holds the setpoint. Further, it should turn the Output on if the actual temperature is lower than the setpoint. We still want the regulation to run when the temperature has changed. An example can be when Actual.Actual_temperature has the temperature read from the servant Temperature or the setpoint has changed.
Step 1: Create supervisor data
1. Open your control component XX Temperature Regulator Notification.
2. As the data-record-type (PD_17514) is already made, just insert a new NON-volatile variable based on the data type PD_17514 XX data type for supervisor for temperature regulator.
Note that we have renamed Required to "Set_Point".
3. Assign the variable to the Supervisor in your temperature control component.
Note that Setpoint and Actual temperature are of type [Absolute temperature].
SEE HOW IT WORKS
Step 2: Adjust the regulating algorithm
So we can move on to the step 2.
Implementation of step 2
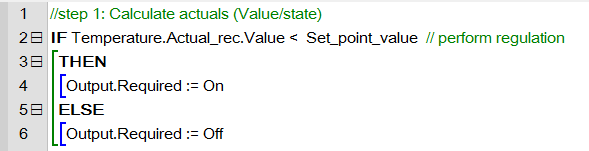
1. Find the method Required changed in XX Temperature Regulator Notification. Right-click and press "OVERRIDE".
2. You need to read the new setpoint (Required) into the local variable and then run the regulation (call of the method Calculate_Actual() is performed in the ancestor (the statement INHERITED)).
Your code in Required changed should look like this:
SEE HOW IT WORKS
Calculate the condition
The condition of a component is calculated from the error state of the component and the condition of its servants.
The condition of a lower-level servant ripples up to higher-level supervisors.
Step 3: Calculate the condition
Our temperature regulator has two servants i.e. temperature and output. For this tutorial, we will assume the control component itself can’t generate any errors. So the condition of the control component is calculated from the conditions of the two servants.
1. Open your control component "XX Temperature regulator notification".
3. Write your code so that the condition of the component is the larger of the two servant conditions.
4. Code to add:
Please remark !: The calculation of the Condition is made with a CASE in order to handle the situation, where one or both of the Conditions are Invalid.
SEE HOW IT WORKS
Step 4: Update the Actual record
Our Actual record has two records: Condition and Actual temperature.
We already sent the condition via the Set Condition method so all we need to do is update Actual. And recall that this value needs to be the actual temperature as read by the servant "Temperature".
Code to add:
SEE HOW IT WORKS
Your total code in "calculate actual" needs to look like this:
The changes to the component is done. Now, we need to update the view.
Step 5: Update your view
1. Open the view "Button for XX temperature regulator notification assembly".
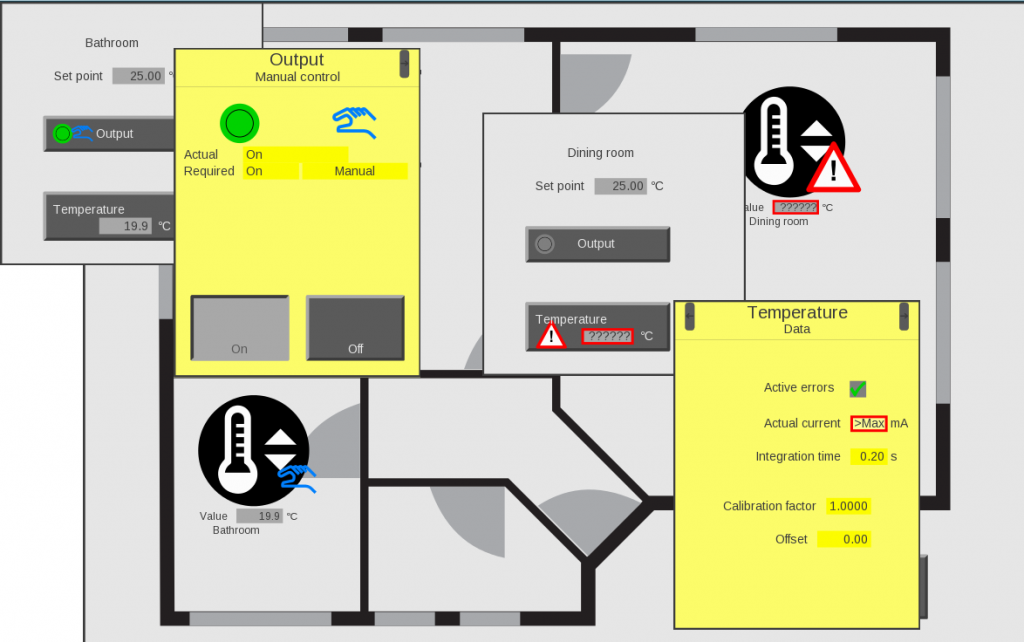
2. Add necessary views a. Right-click on view list -> add -> view for control instance b. Find the supervisor of XX temperature regulator notification-> actual rec-> condition. c. Double-click and select "PD_15375 – Show Condition without auto state". d. Set "Disable hit test". We will not open the default window for this data type.
3. Open the graphic editor and drag the condition view to where you want. Your view should look like this:
A supervisor can now control our temperature regulator, but it can still run on its own. Further, the component can show its condition (step 3), so let’s explore this before we move on.
SEE HOW IT WORKS
Step 6: Save, build and run your project
1. Open your project "XX Temperature Regulator notification project".